
According to Insider Intelligence, Snapchat's userbase will reach 493.7 million by the end of 2022 and 500 million in 2024 making it one of the most popular social media platforms today. As such, it is no surprise that many marketers try to leverage Snapchat Ads' potential to reach a wider audience. Although the platform provides a built-in analytics tool that you can use (Hootsuite has a great article on that!), chances are you are using multiple platforms and will need all your data in one place.
In this quick start guide, we will show you how you can store data with Cloud SQL for MySQL (more about MySQL in our YouTube to MySQL guide). But why Cloud SQL? Unless it's your personal project, in today's day and age it makes no sense to have a database stored only locally which is why there are numerous services that can host your database, such as, you guessed it, Google Cloud SQL.
So how can you load your data with this service? As usual, we will introduce different methods of data extraction and import but this time, let's first start with some Google Cloud SQL for MySQL basics.
- [Before We Start] Set up Cloud SQL for MySQL
- [A] Get to Know the Platform: Manual Data Import
- [B] Custom Solution: Build Your Own Data Pipeline
- [C] Dataddo: Easy, Fast, and Secure Data Load
- Conclusion
[Before We Start] Set up Cloud SQL for MySQL
Although the creation of the instance itself is quite intuitive (the platform's prompts will guide you through the process), there are a few things you can set up beforehand so you don't have to worry about them later. If you don't need this, you can skip to the different methods—Manual Data Import, Build Your Own Pipeline, or Easy, Fast, and Secure Data Load.
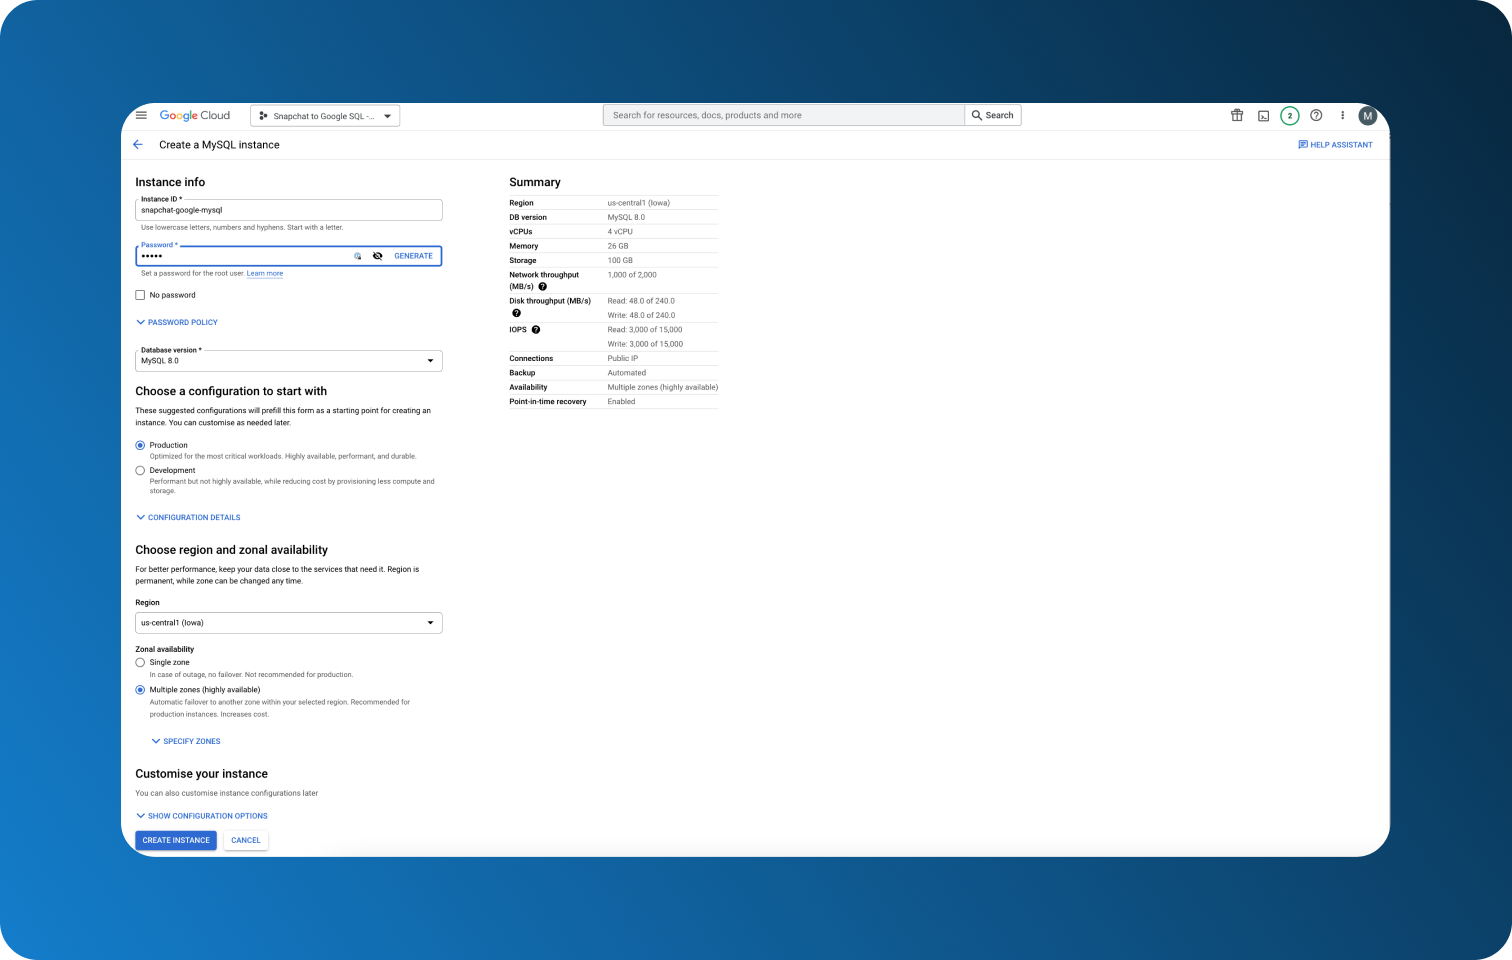
1. Create MySQL Instance
Firstly, go to your Google Cloud Console and Select a project in the top panel. Next, select MySQL and Enable API if it hasn't been enabled for this particular project yet.
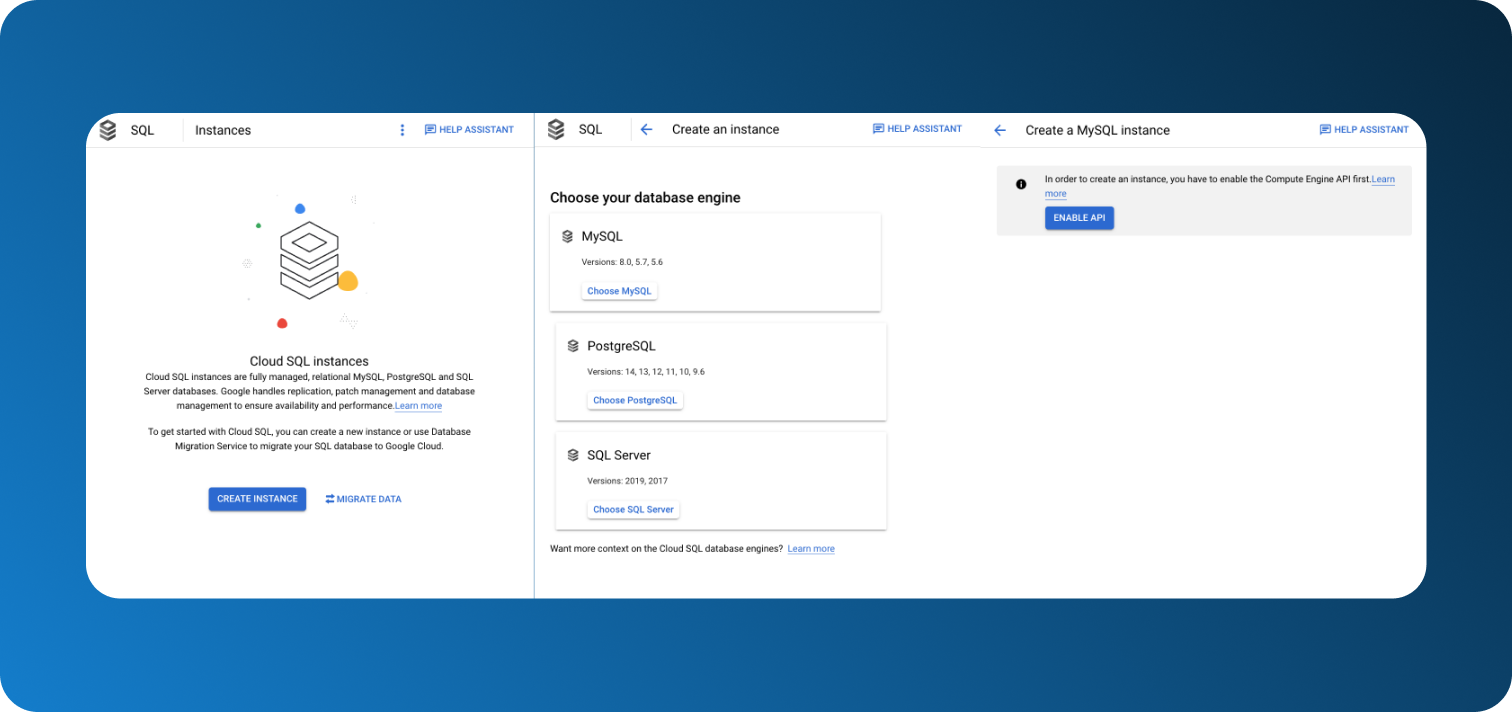
Fill in your Instance's ID and choose a password if you want to. We recommend using a password to be able to later connect to third-party services. If needed, you can create a secondary User to your database without a password for easy personal access afterwards.
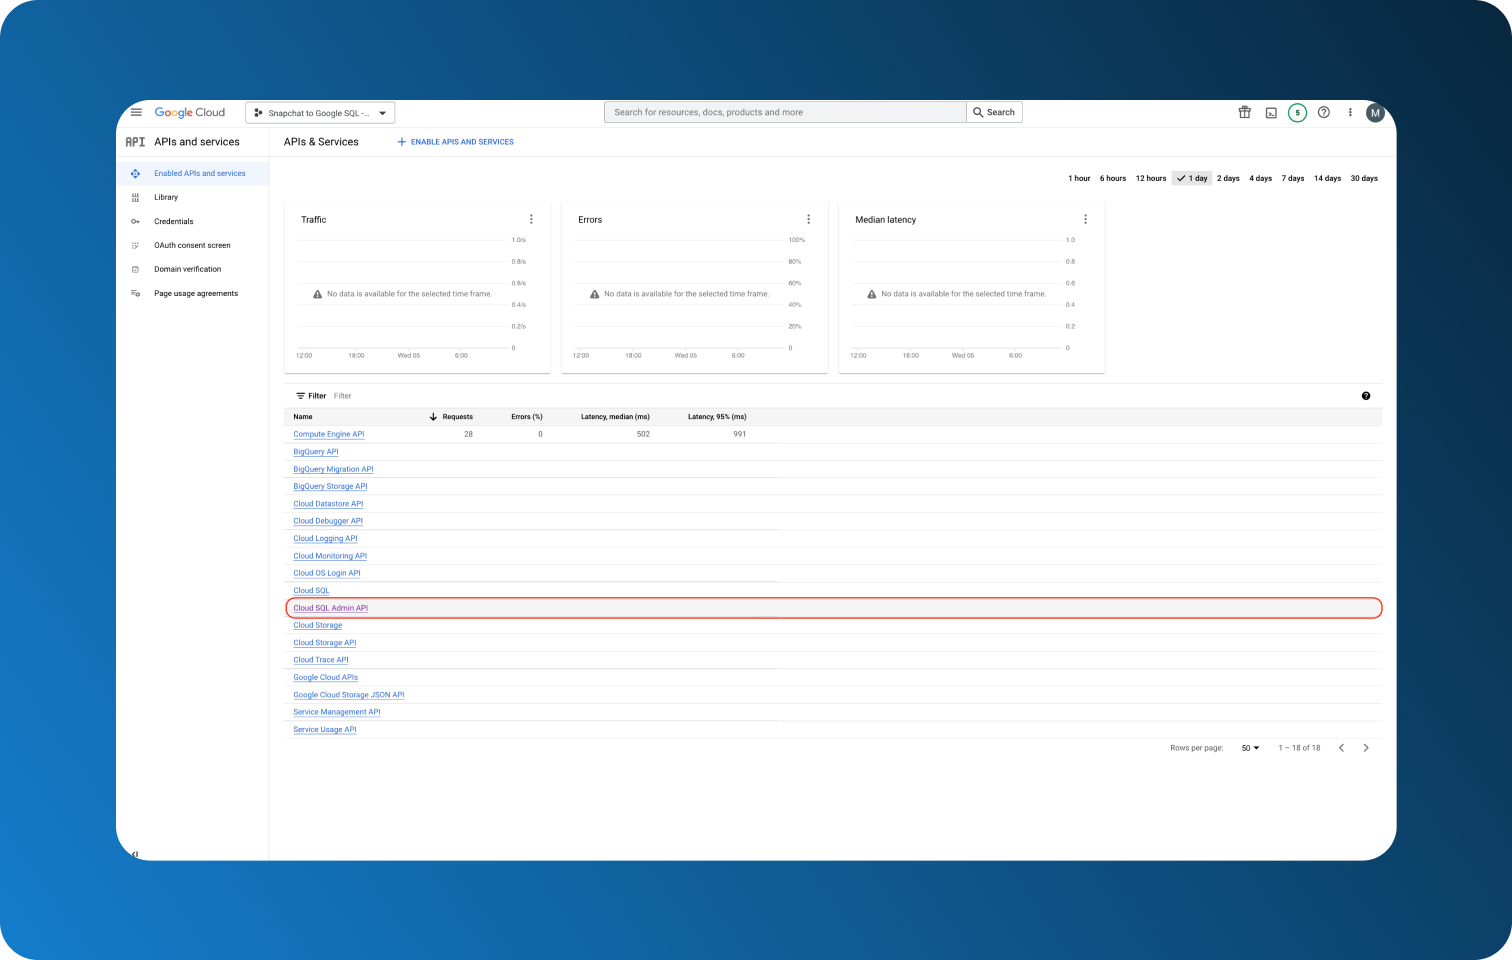
2. Make Sure Cloud SQL Admin API is Enabled
To work with your database, you will later need Google Cloud Shell. While you can enable it through the Cloud Shell itself, it is not very intuitive which is why it will be better to take care of it now.
Go to Google Cloud general menu and select APIs and Services and choose Enabled APIs and services.
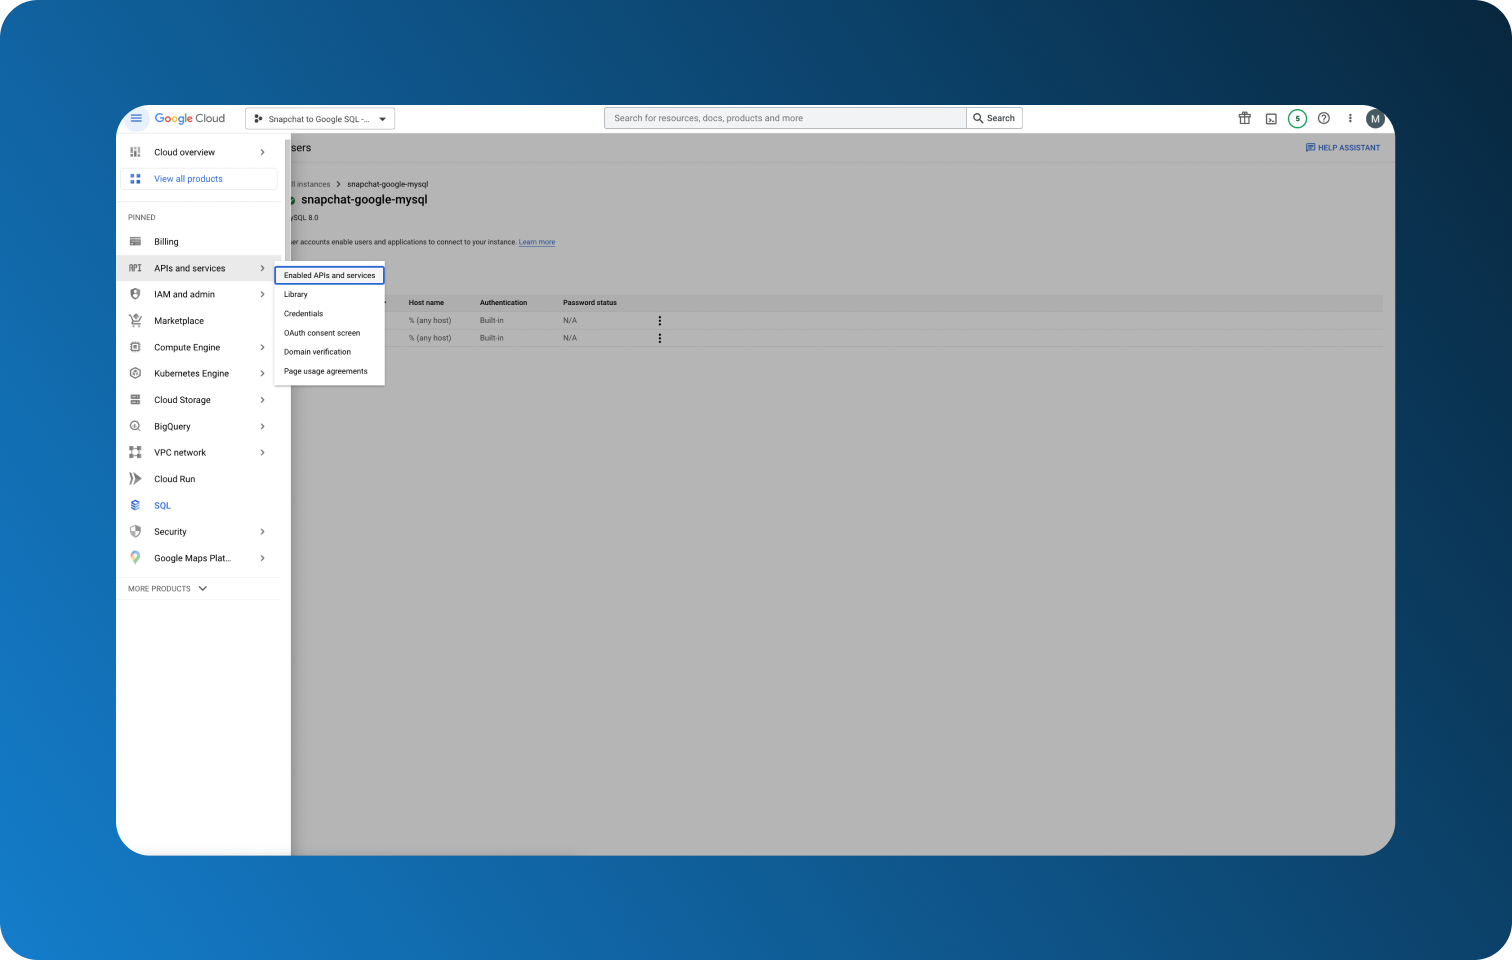
Check whether Google SQL Admin API is among your list of enabled services. If not, click on + Enable APIs and Services at the top to add it.
3. Create Your Database
Finally, create your database. There are two methods with the easier one being accessible through the Console's UI.
From the left menu go to Databases and simply click on Create Database. One thing that you should pay attention to is the Character set through which you choose what languages can be represented in the database.
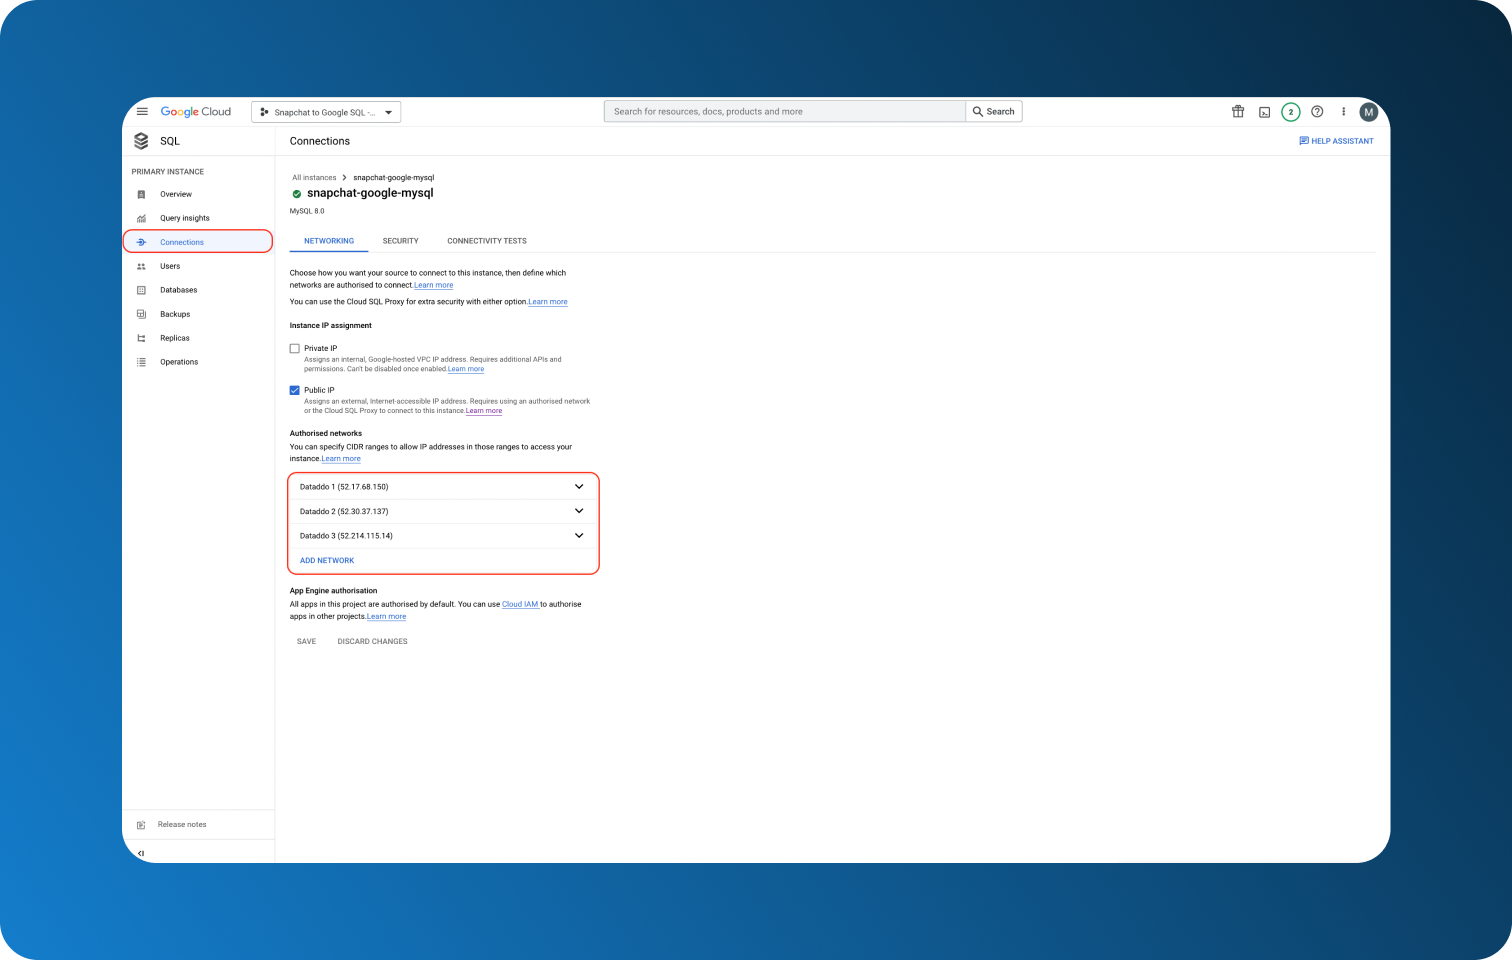
4. Whitelist Networks
This step will be required for methods [B] custom solution and [c] Dataddo as you will be connecting your data through other means. Go to Connections in the left menu and choose ADD NETWORK in the marked area. For example, to use Dataddo, you will need to whitelist the following IPs 52.17.68.150, 52.30.37.137, 52.214.115.147 which you can see in the screenshot below.
[A] Get to Know the Platform: Manual Data Import
Even though we wouldn't recommend this method since it leaves too much room for error, knowing how to load manually can help you get to know the platform faster. We will go over the advantages and disadvantages of this method later in this section, let's first take a look at how to import data.
Step 1 Download Your Snapchat Ads Data
Head over to your Snapchat Ads account and in the top right corner select your Ad account.
- Click on Manage Ads from the menu on top.
- Select Campaigns, Ad Sets, or Ads depending on what you need.
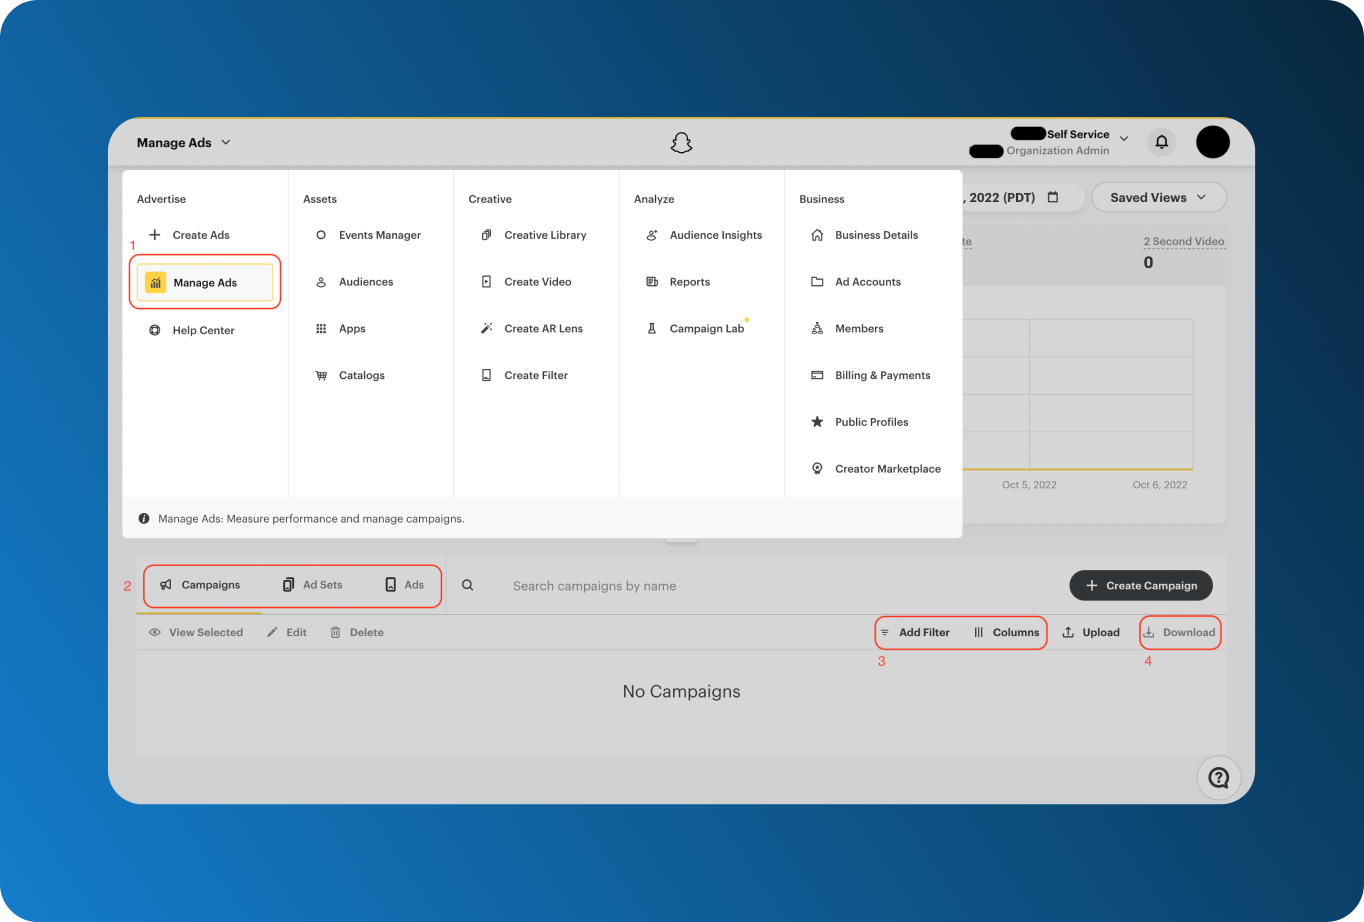
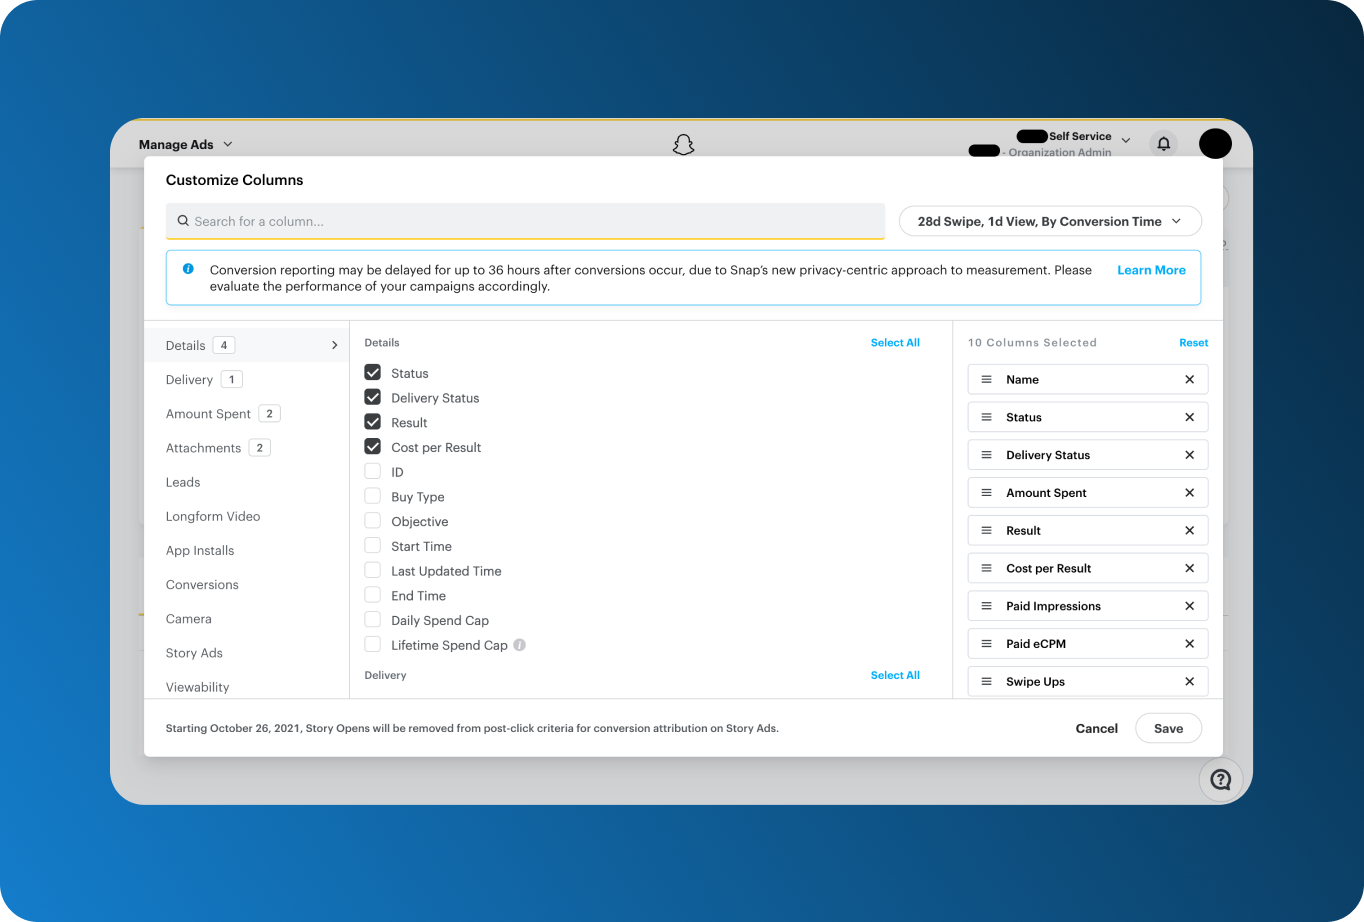
- (Optional) Add filters or choose columns that you would like to export.
- Download your data as CSV.
Step 2 Upload Your Table to Google Storage Bucket
To import your CSV file, you have to use Google Storage Bucket, as of now there is no alternative. Similarly to loading JSON files to Google BigQuery, there are a few limitations. For example, dates have to be in YYYY-MM-DD format otherwise they will appear as 0000-00-00.
.png?width=1364&name=Manual%201%20-%20Import%20files%20to%20Google%20Cloud%20Bucket%20(2).png)
Step 3 Create Your Table (Unskippable)
If you're manually importing your files, you have to have a table created first.
- Open Cloud Shell and log in with your username and, if needed, password. Here we created a new User without a password for faster login.
- Create and/or select your database, and create your table.
CREATE DATABASE database_name; // skip if you used the UI to create it
\u database_name // USE database_name is of course also viable
create table table_name (CampaignDate date, CampaignName varchar(255), CampaignStatus varchar(255), Impressions int, SwipeUps int, Views int); // if the columns created do not correspond to those in your file, use importContext.csvImportOptions.columns[]
- Import the file from your Bucket after making sure the table name is the same as the table you created.
- Finally, open Cloud Shell again to check your table (Cloud Shell could have been open during the whole importing process).
Type SELECT * FROM table_name; to see the whole table
If you had a header row in your original file, don't forget to remove it as it will also get imported into the table.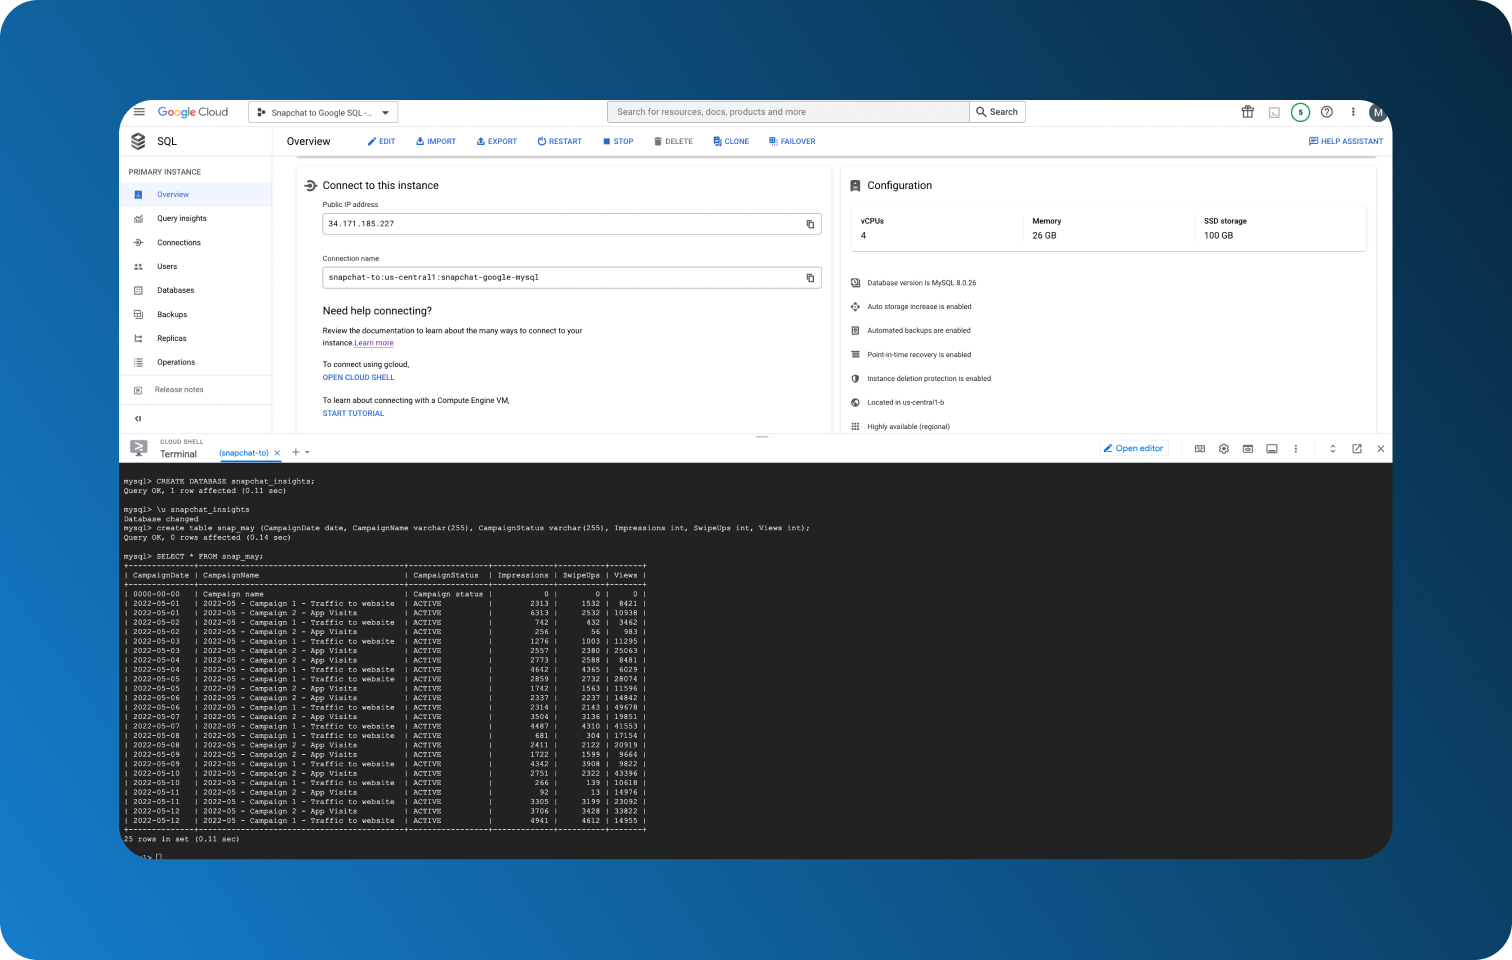
Too Much Room For Error
To be perfectly honest, all the tips regarding what to pay attention to came from personal experience. In every step described in this guide, we highlighted the errors we've made in the past using this method.
On some errors, like removing header rows, you might spend extra few minutes and they are a mild annoyance at worst. Some, however, can compromise your data integrity. Imagine missing a column in the table you created or downloading a table with an extra column without noticing. Multiply this by however many sources you're using. If not spotted immediately, your company could have been working with incomplete and inaccurate data the whole time.
As data extraction and loading is more of a mechanical activity but still with things you need to pay attention to, it is much easier to make a mistake without realizing it. Thankfully, these tasks can be automated either by yourself or through third-party services, such as Dataddo, leaving you with more time to focus on things that bring value, such as data analysis itself.
[B] Custom Solution: Build Your Own Data Pipeline
One way to automate your data loading is by building your own data pipeline. As going more into detail would deserve an article on its own (or a whole series of lectures) and we have recommended some articles and forums in the past, here are some of the biggest pros and cons.
Undeniably, the biggest advantage is that the solution will be tailor-made for your needs. As you know your organization the best, you will also know what to focus on when building your pipelines. As such, you will not be paying for functions that you don't have a use for and you will have a solution to unique challenges that existing tools cannot solve.
On the other hand, maintenance is a great disadvantage as it is very time-consuming. While the building of the pipeline will end eventually (and that on its own can be very time-consuming depending on the complexity of your organization's data architecture), it doesn't mean that pipelines won't keep breaking. Frequently changing APIs, unexpected data volumes, adding new services can all result in smaller or bigger headaches.
If the above-described challenges are hindering your data product, check out headless data integration options. The maintenance side will be taken care of so you can turn your attention to other aspects of your work.
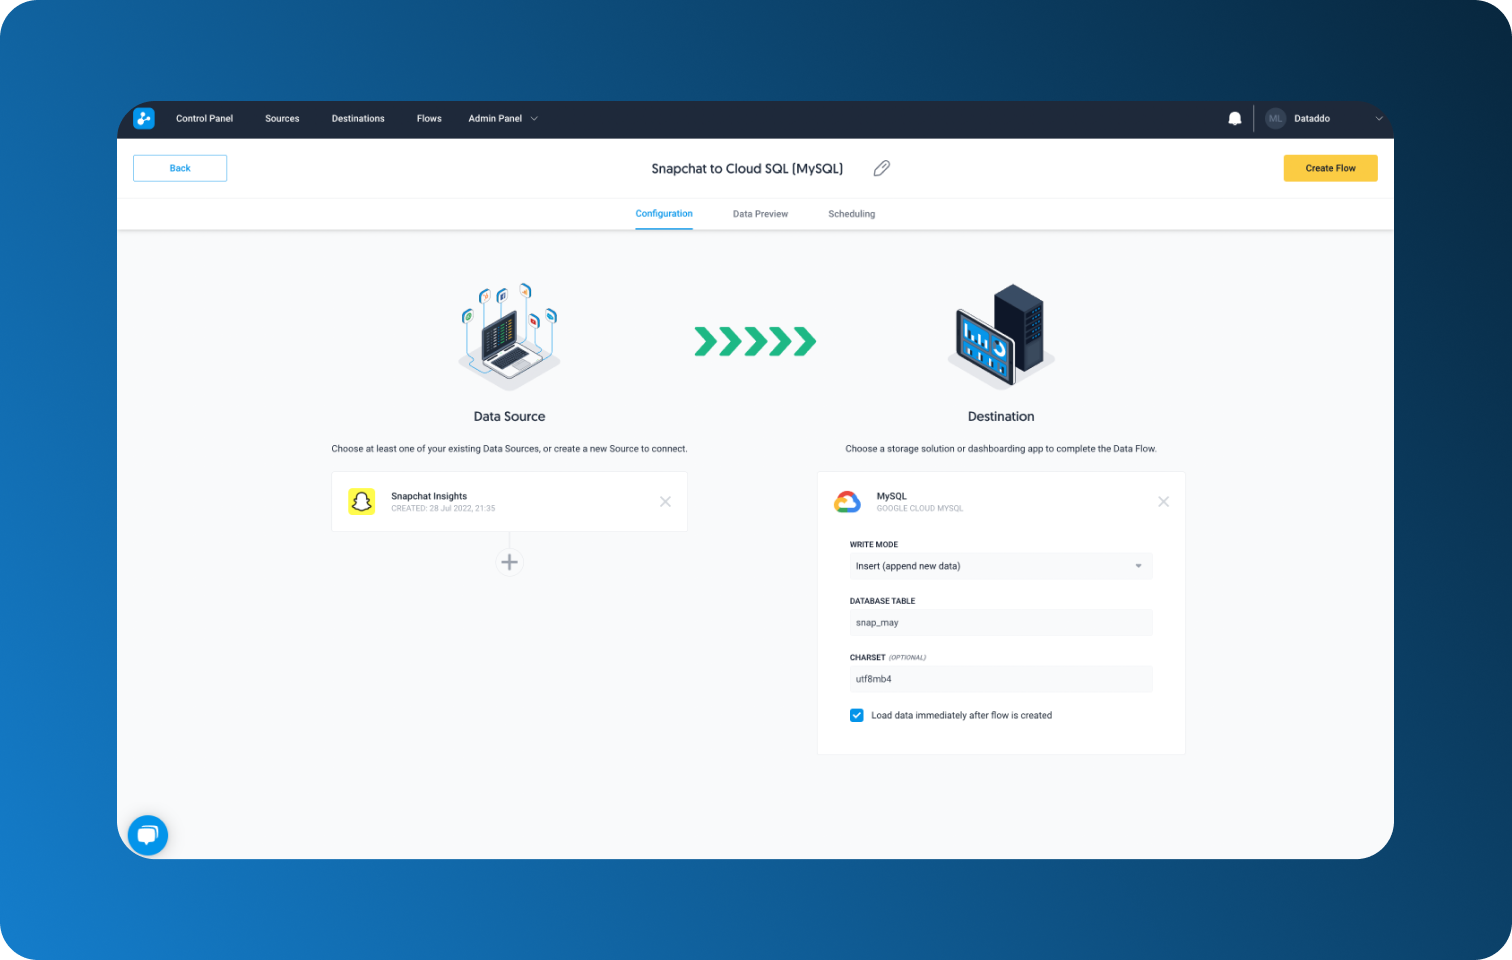
[C] Dataddo: Easy, Fast, and Secure Data Load
If the first two methods weren't for you (and we hope we properly discouraged you from manual data loading), here is how you can use a tool like Dataddo for your data integration. Connecting Snapchat Ads to Cloud SQL for MySQL will take just three steps that the platform itself will guide you through but we'd still like to give you an idea of how it's done.
Step 1 Create Your Data Source
Go to Sources on the top panel and choose Create Source. Choose Snapchat Ads and authorize your account if you haven't already. Select what metrics and attributes you want to extract. Being able to choose what you want to extract can be very cost-effective as most data warehouses charge according to data transfer size.
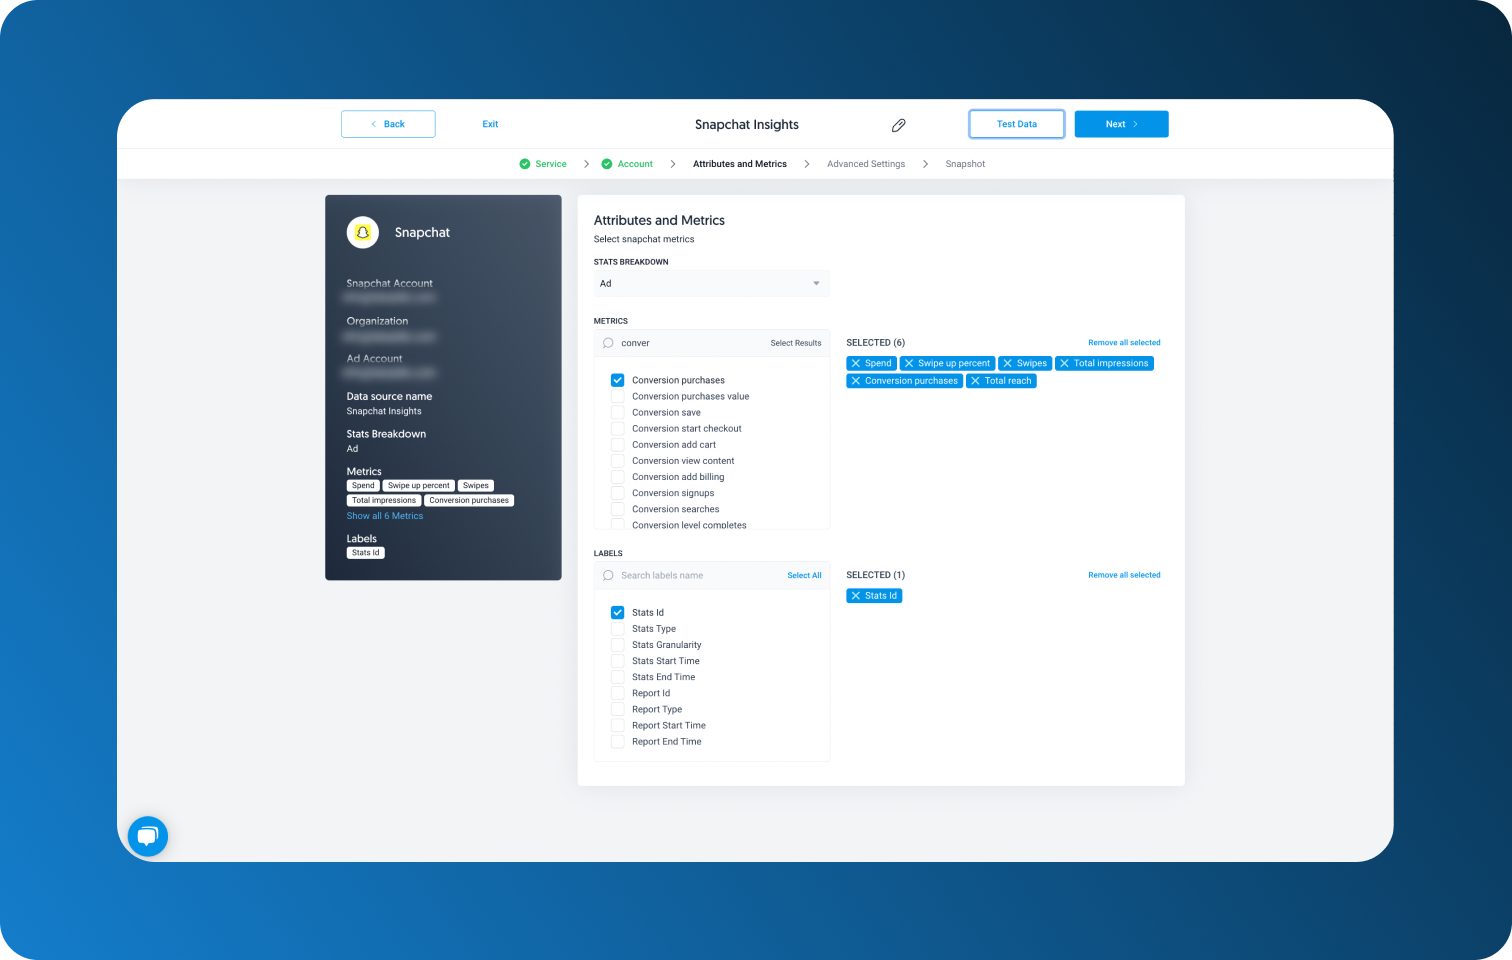
Finally, click on Test Data to see what your data will look like.
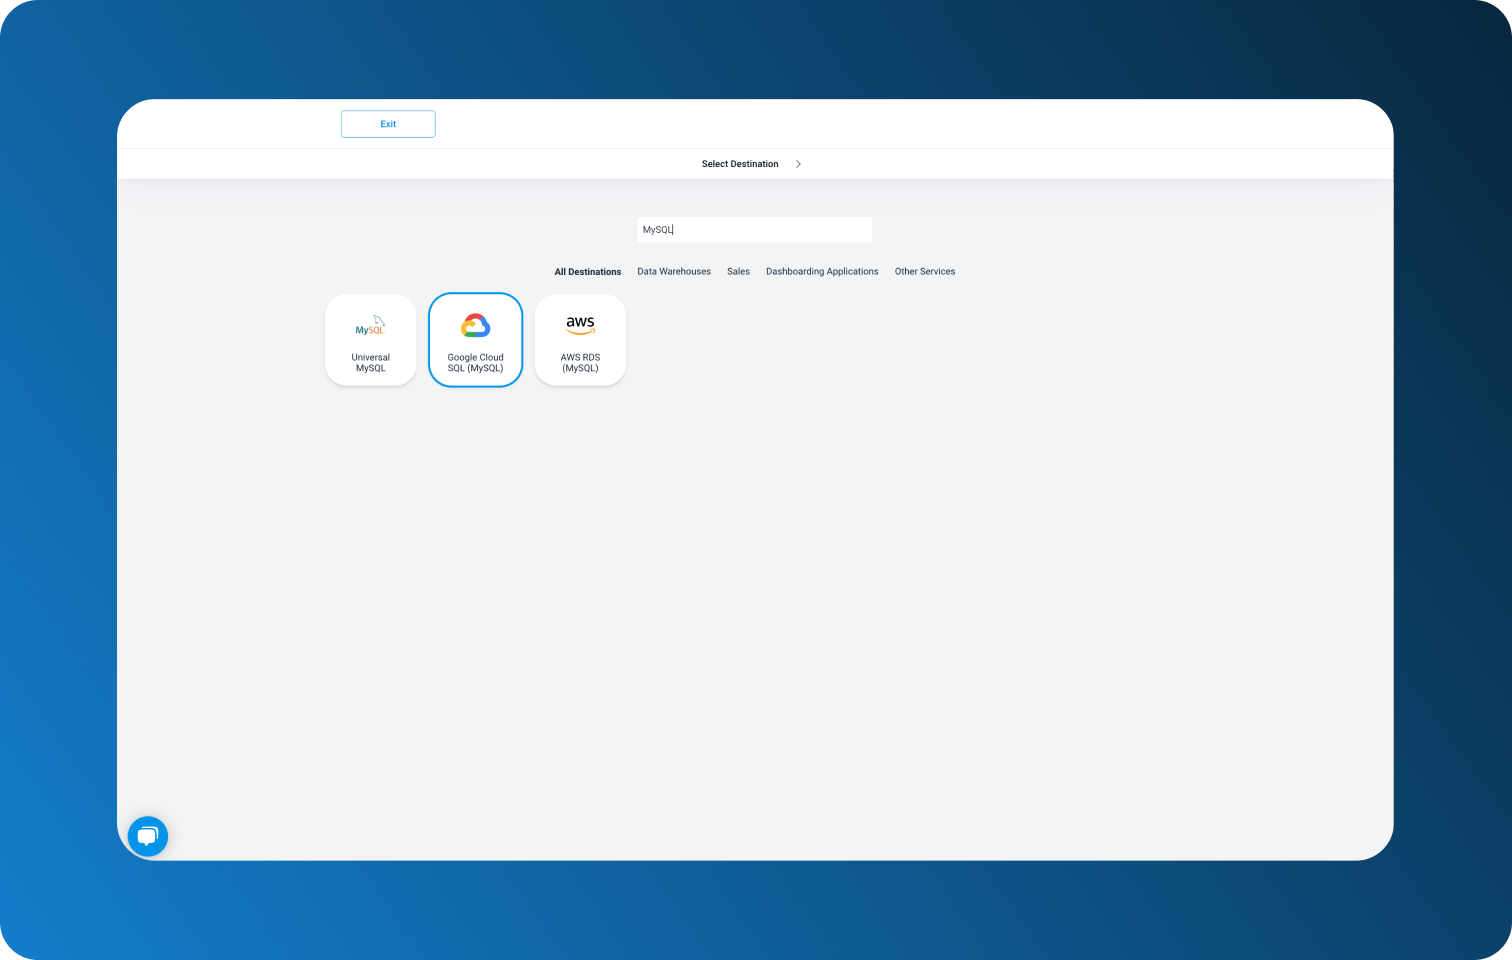
Step 2 Create Destination
Go back to the panel on the top, click on Destinations, and choose Google Cloud SQL (MySQL). Follow the prompts to set up your destination.
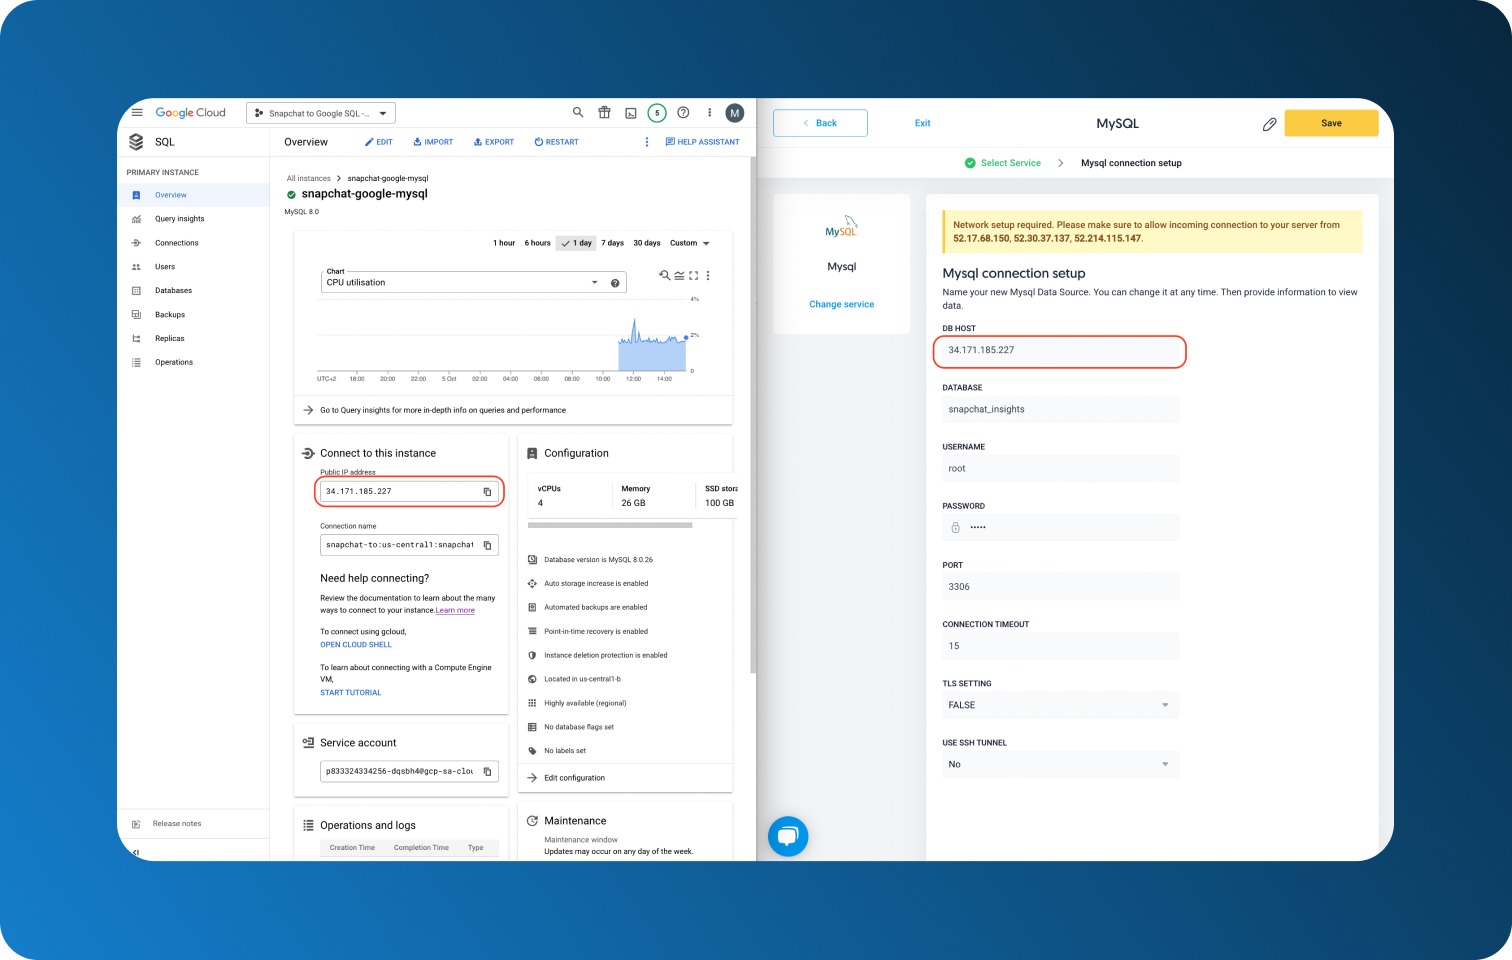
If you haven't done so beforehand and aren't sure how to authorize your Cloud SQL for MySQL service, refer to the screenshot below. You will find all the necessary information in your Cloud Console under Connect to this instance. Don't forget to whitelist the IP addresses, fill in the information and click on Save.
Step 3 Create Data Flow
Both your source and destination are set up and you can now create your flow.
Click on Flows in the top panel and add your newly created source and destination. Name your table and double-check if your Charset (character set) is the same as your database's.
 And that's all! Now all that's left is to open your Cloud Shell and open your database with
\u database_name
and select your table with
SELECT * FROM table_name;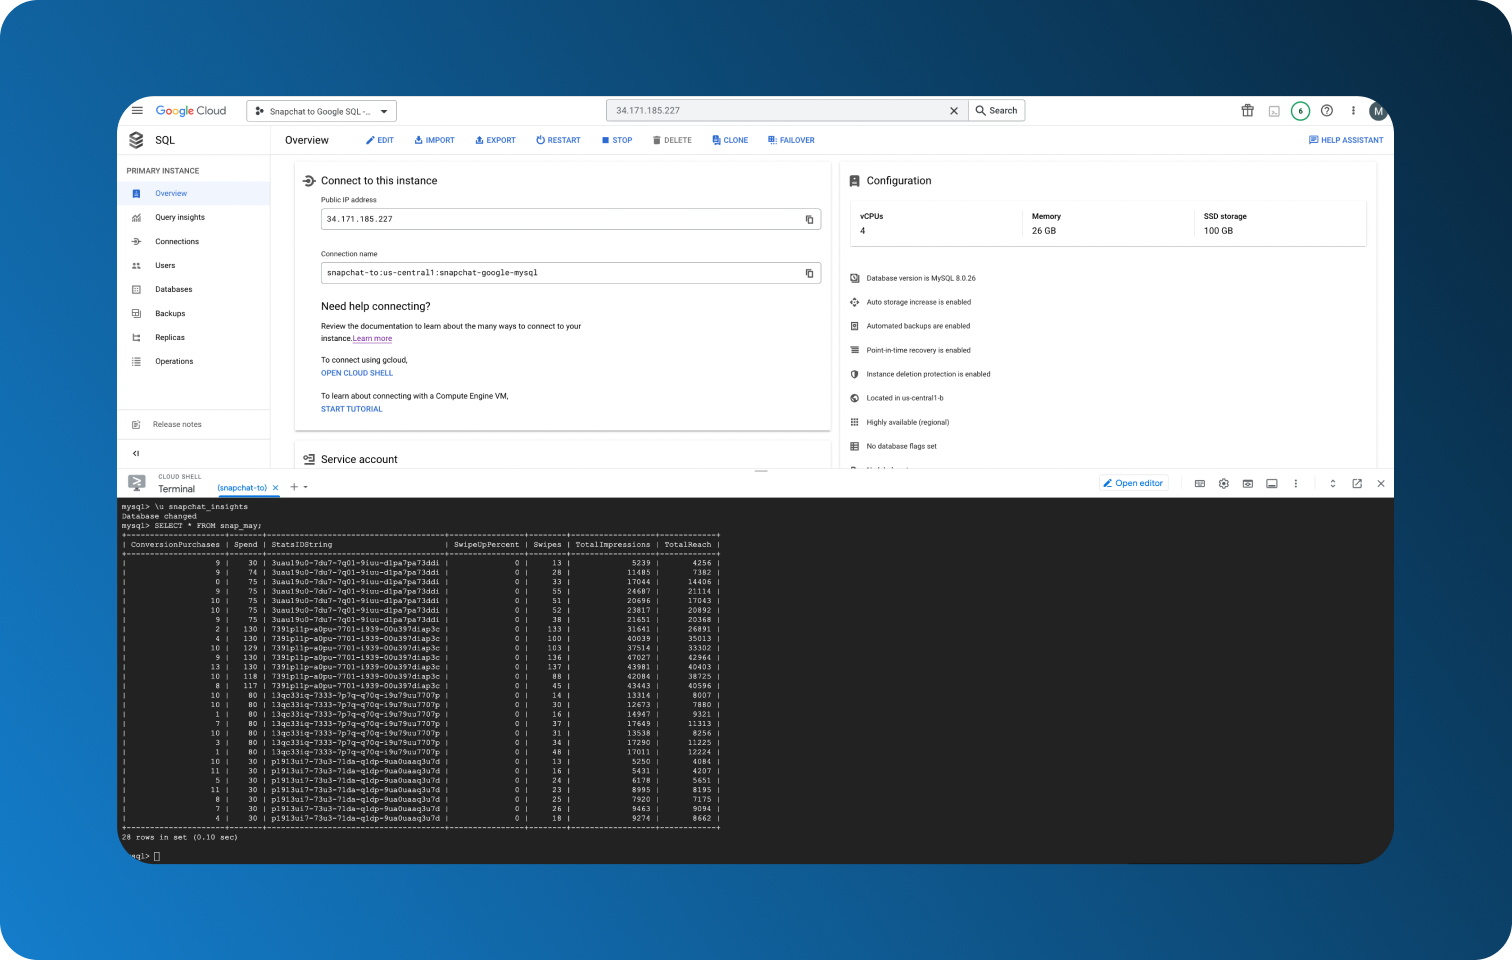
With Dataddo, there is no need to worry about your data being in the right format for MySQL to accept it, nor will you have to worry about different columns being inserted. This is a great time-saver, especially in the long run and future data loads, as you don’t have to focus on small but time-consuming details while also fully eliminating any possibility of error.
Conclusion
Despite pointing out the many flaws of manual data loading, knowing how to do it (at least in theory) will be beneficial for both automated methods. If you know how the whole process works, you will be able to truly appreciate how much time and energy you can save.
Both building your own pipeline and using a tool such as Dataddo are methods that lower or completely nullify the risks of compromised data integrity due to human error. Nevertheless, as each has its own set of pros and cons, it's impossible to say which is better. The choice should fully depend on your organization's needs.
Hopefully, this guide was helpful to you, especially if you are just starting out with Google Cloud services, or are debating how to approach your data journey.
|
See how Snapchat Ads data can help your business Just a few quick steps to get your data to your Cloud SQL for MySQL for better analysis, without the hassle.
|


Comments