Exact Online is a powerful software that automates accounting, financial, ERP, HRM, and CRM-related processes. All of its functionalities make Exact a very complex and highly customizable software, which is great. But platforms like this can often cause further data-related headaches for organizations.
Because Exact is highly customizable, connecting to other systems can prove to be a bit tricky, requiring the use of APIs and more than an average amount of technological savvy. This can make consolidating data into your dashboard a daunting task.
Connecting the Hard Way
In connecting your Exact Online data to your dashboard, you have a few options:
- Spend countless hours manually extracting and loading data yourself.
- Hire an in-house team dedicated to data governance.
- Hire a freelance software engineer who develops custom pipelines and bills you for maintenance and updates.
If you’re on a budget or simply don’t want to spend a fortune on creating custom data pipelines, these options probably look pretty terrible. Thankfully, there’s another option that can save you both time and money - a universal data integration pipeline, like Dataddo.
Connecting the Easy Way - with Dataddo
With a no-code, low-maintenance platform like Dataddo, you can spend your time and money on more important things than data extraction and transformation.
Dataddo is an affordable option for nearly any business trying to integrate data from multiple data sources. And after the initial set-up, you won't need to continually update your pipelines or periodically check for bugs - Dataddo will send you notifications if anything goes wrong.
So how simple is it really? Well, take a look for yourself.
The Step-By-Step
- Start by creating a new source in the Dataddo platform.
/Data%20Sources%20-%20Create%20Source.png?width=2880&name=Data%20Sources%20-%20Create%20Source.png)
- Search for and select your data source, Exact Online.
/Data%20sources%20-%20choose%20connectors.png?width=770&name=Data%20sources%20-%20choose%20connectors.png)
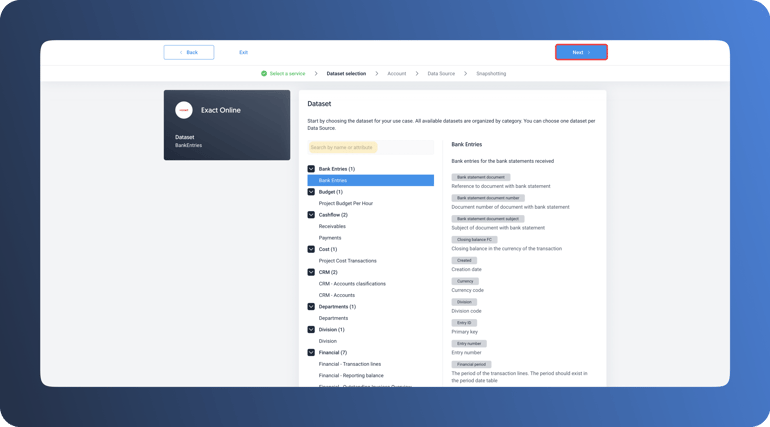
- Select one of the available 25 Datasets to choose which data Dataddo will pull from your Exact Online account. Then click next.
NOTE: If you are not sure which Dataset you need, but you know which Metrics and Attributes you are looking for, you can use the Search by name or attribute function or you can browse through all the possible Attributes and Metrics for each Dataset by clicking on the specific Dataset.

- Next, you'll select the Exact Online account and division you'd like Dataddo to pull data from.
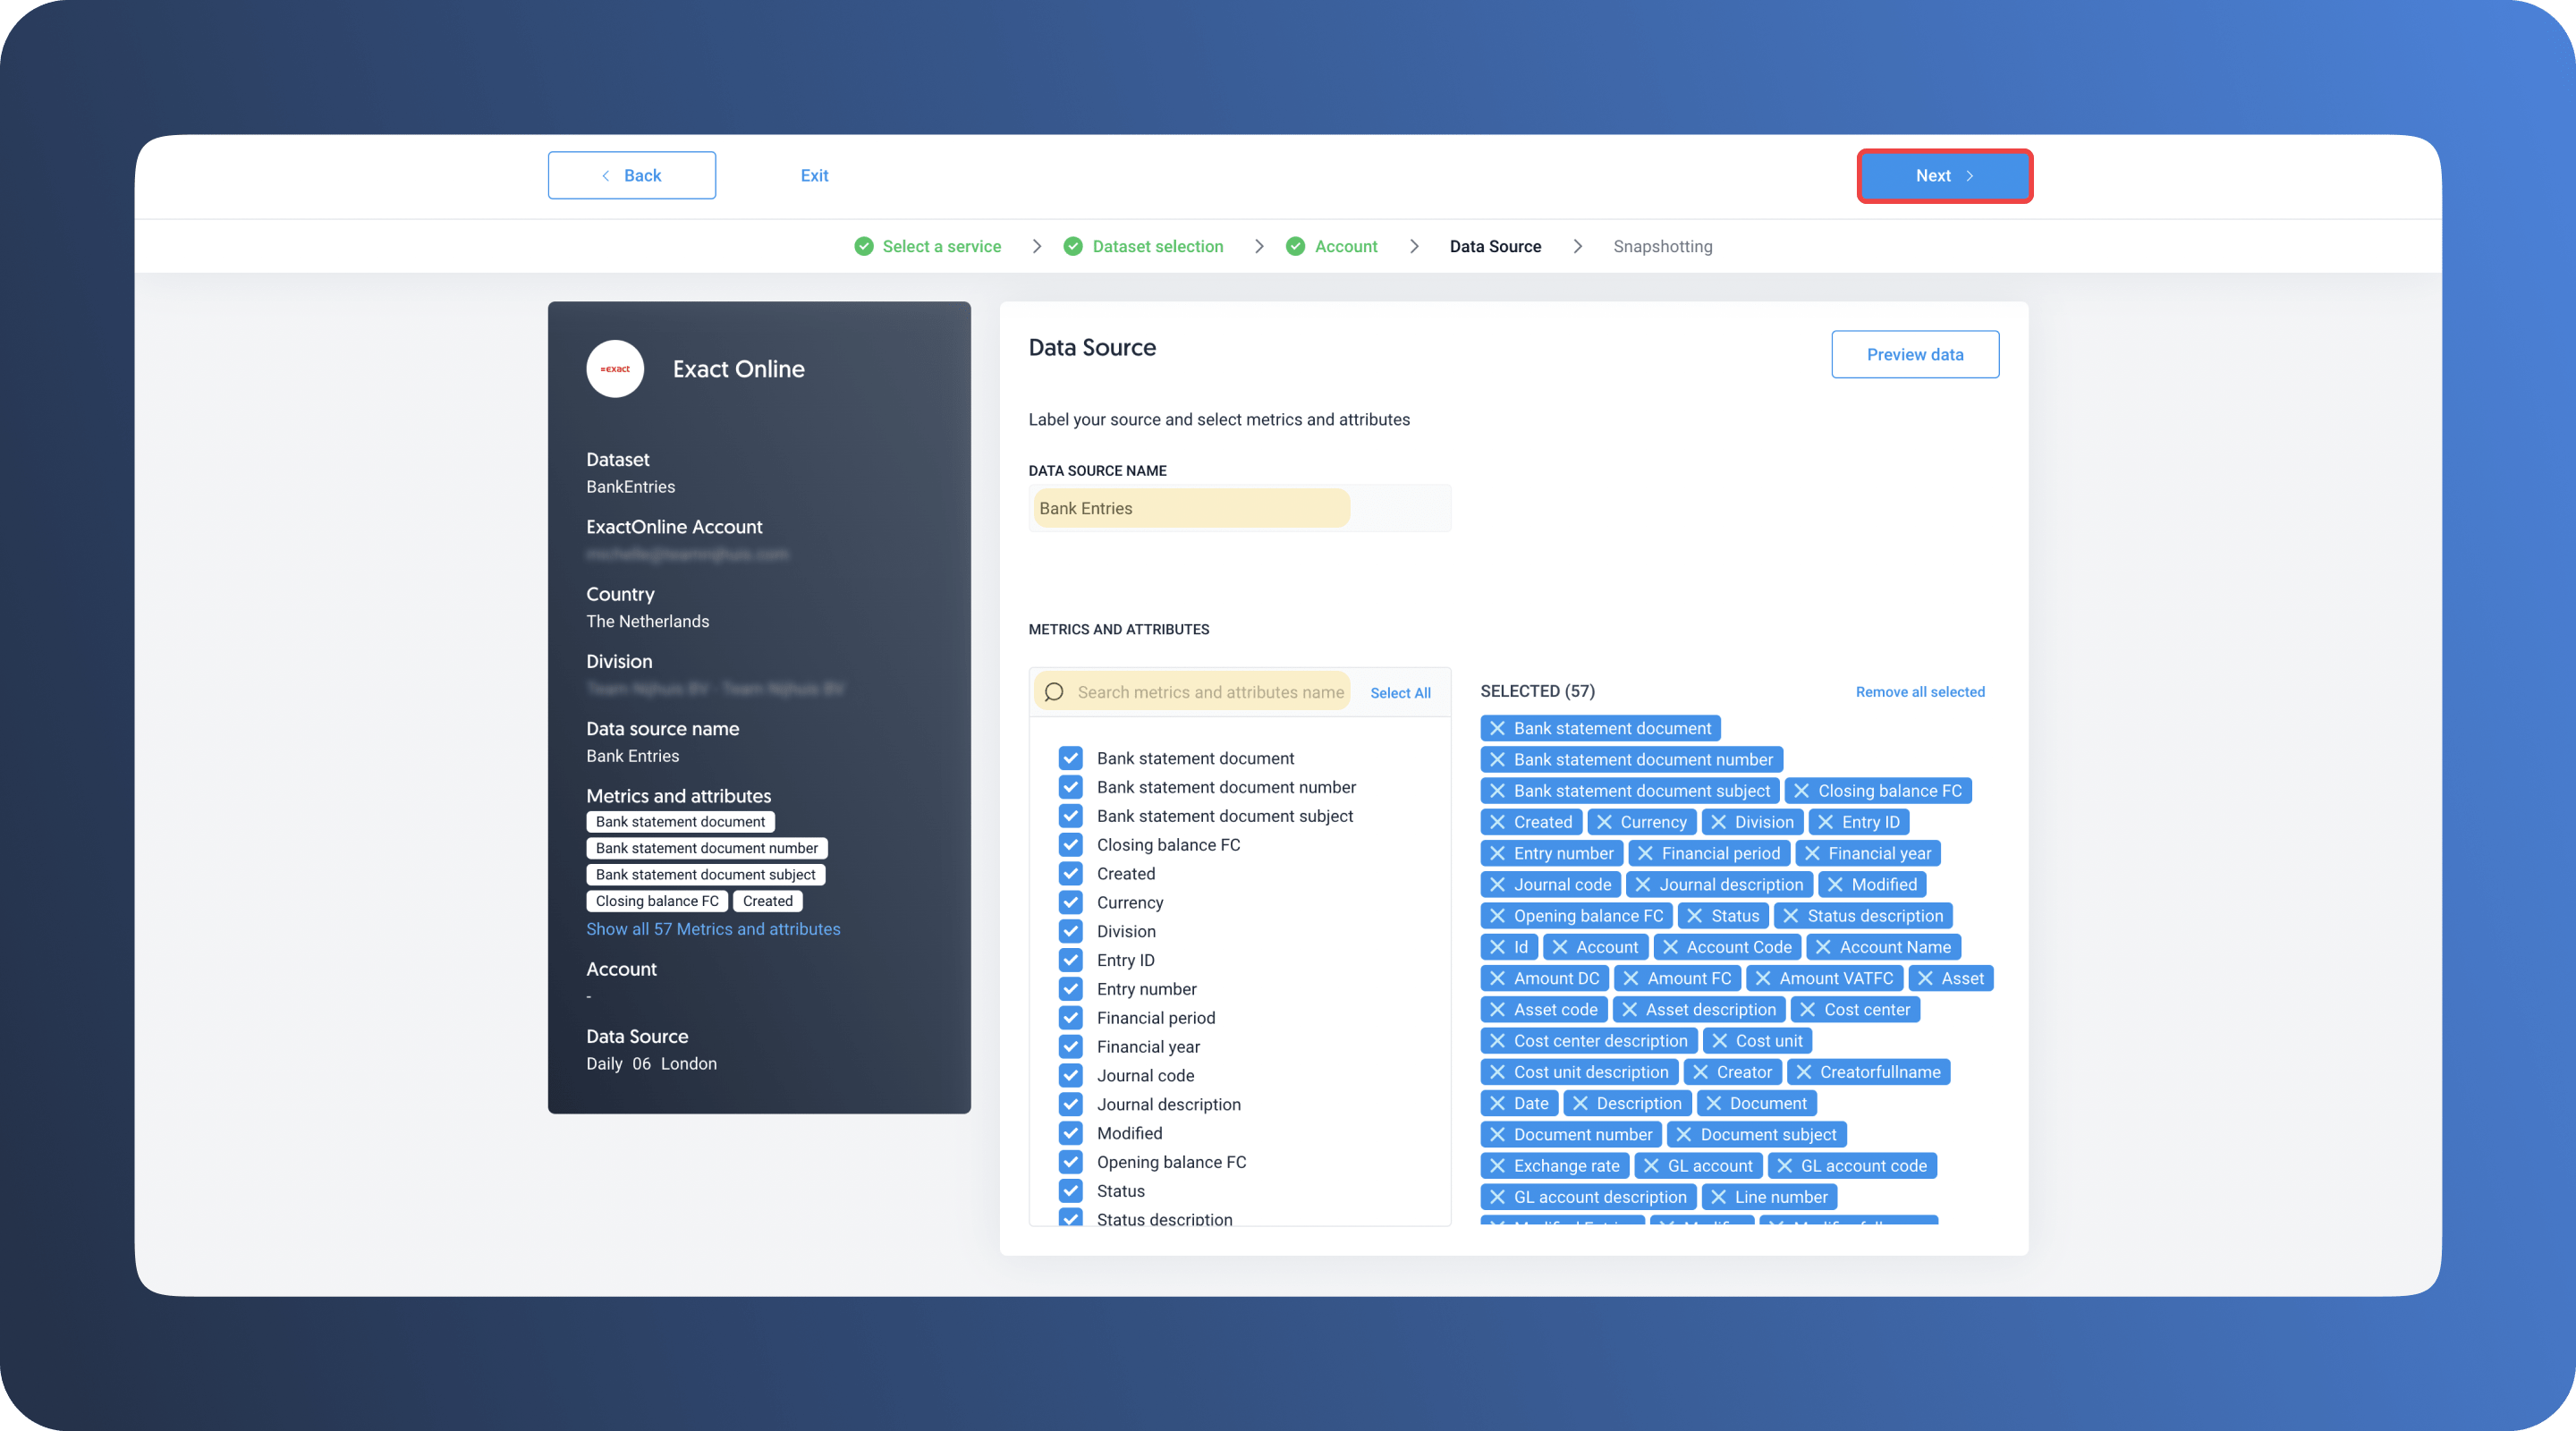
- On the next screen, you'll be able to name your data source and select the attributes you would like extracted. Once your attributes have been selected, click next.

- Now, you'll configure your Snapshot settings. Snapshots allow you to get up-to-date data at set intervals. By selecting 'Append' for Snapshot retention, Dataddo is able to store your previous Snapshots so you can get a view of your historical data.
/Data%20Sources%20-%20Snapshotting.png?width=770&name=Data%20Sources%20-%20Snapshotting.png)
- Once your Snapshot preferences have been configured, click 'See Preview'. You'll then see a preview of the table Dataddo will create based on your data set and attribution selections. If everything looks good to go, hit 'Save & Create Flow' in the top right corner of your screen.
/Data%20source%20-%20create%20-%20preview.png?width=770&name=Data%20source%20-%20create%20-%20preview.png)
- To set up your data flow, you'll need to select a data source from your saved sources and then select a destination. All available dashboarding apps will be available to select without prior configuration. Once your data source (or sources) and destination have been selected, click 'Configuration' in the top right corner of your screen.
/My%20Flows%20-%20New%20Flow.png?width=2880&name=My%20Flows%20-%20New%20Flow.png)
- Label your data flow and click 'Create Flow'. You will then be given the instructions for configuring your dashboard including the Dataddo API key and API Endpoint ID that you will insert in your dashboarding tool.
- Configure your dashboard and you'll be able to start visualizing your Exact Online data in no time!
And if you run into any issues or have any questions along the way, Dataddo's support staff is always available to assist.
Why Dataddo?
Dataddo, a no-code data integration platform is able to easily connect Exact Online, or any other data source, to various data destinations, including data warehouses and dashboarding applications.
Stop the headache of manual data extraction and get all of your data where it needs to go with Dataddo. But don't just take our word for it - try out a 14-day free trial with full platform functionality and onboarding assistance.
|
See how Dataddo can help your business Just a few quick steps to get your data to your dashboard for better analysis, without the hassle. |
Additional Power BI Tips, Tricks, and Resources
Continue reading the Dataddo blog for more Power BI tips, tricks, and resources!
- Smarter Financial Dashboards for SMEs (with Free Power BI Template)
- Overcome Data Blending Limitations of Tableau, Looker, Power BI
- How to Connect NetSuite to Power BI: ODBC vs. Dataddo
- How to Connect Sage Accounting to Power BI for FREE: Direct vs. Dataddo
- How to Connect Google Sheets with Power BI: Direct vs. Dataddo
- How to Connect Stripe to Power BI: Direct vs. Dataddo
- How to Connect Google Analytics to Power BI for FREE: Direct vs. Dataddo
- How to connect JSON with Power BI: Direct vs. Dataddo
- How to Connect SEMrush to Power BI for FREE
- Facebook Ads Dashboard Using Dataddo and Power BI
- Connecting Xero to Power BI: Native or Third-Party Connector?
- Power BI vs Tableau: The Breakdown


Comments